Create LVM Thin Pool in Proxmox VE

Tested on: Proxmox VE 7.x and 8.x | Last verified: November 2025
LVM Thin Pools are a powerful storage option for Proxmox VE, offering over-provisioning capabilities and efficient space utilization. This guide shows you how to create an LVM Thin Pool from multiple disks and add it to Proxmox for VM and container storage.
What is LVM Thin Provisioning?
LVM (Logical Volume Manager) is an abstraction layer over physical storage that provides flexibility in managing disk space. Thin provisioning allows you to create virtual volumes larger than the available physical space—storage is only allocated when actually written to.
Example: You can create 10 VMs with 100GB disks each (1TB total) on a 500GB thin pool. The VMs only consume space as they write data, not when created.
LVM Thin vs ZFS: Which Should You Use?
Both are excellent choices, but they serve different needs:
Use LVM Thin when:
- ✅ You want over-provisioning flexibility
- ✅ You need simple, fast storage setup
- ✅ You already know LVM from other Linux systems
- ✅ You want lower memory overhead
- ✅ You're using commodity hardware
Use ZFS when:
- ✅ You want native snapshots and cloning
- ✅ Data integrity is critical (checksums)
- ✅ You need compression and deduplication
- ✅ You have ECC memory (recommended)
- ✅ (See our ZFS guide)
TL;DR: ZFS is more feature-rich but heavier; LVM Thin is simpler and lighter.
Prerequisites
- Proxmox VE installed
- Two or more disks for your LVM pool
- SSH access to your Proxmox host
Note: Proxmox has a GUI "Create Thinpool" button under Disks → LVM-Thin, but it only works for single-disk setups. For multi-disk pools (which this tutorial covers), you need to use the command line.
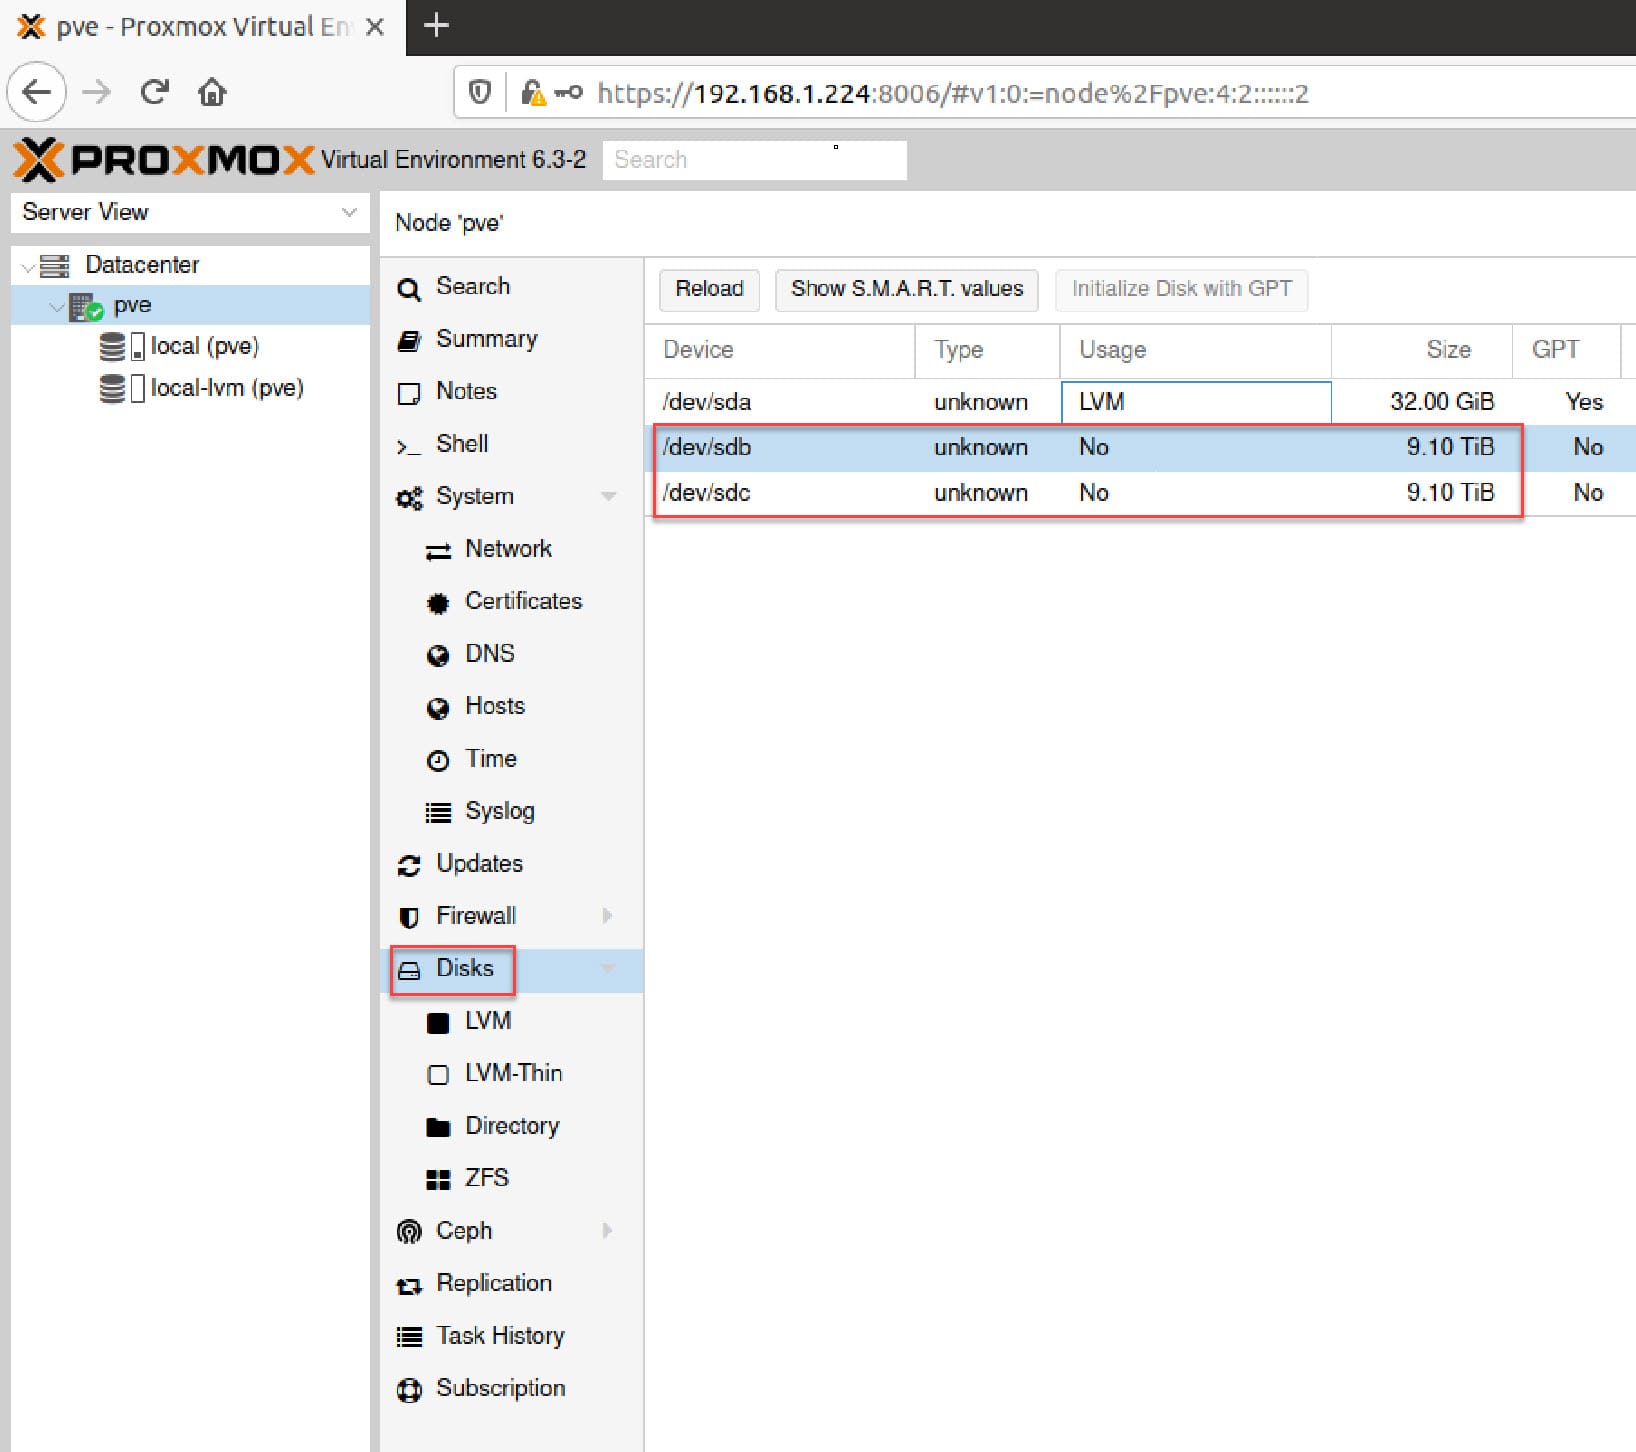
Step 1: Verify Your Disks
In the Proxmox web UI, navigate to your node → Disks to verify your available drives.
Identify which disks you'll use (in this example: /dev/sdb and /dev/sdc).
Step 2: Wipe the Disks
SSH into your Proxmox host and wipe any existing filesystem signatures:
bash
wipefs -a /dev/sdb /dev/sdcReplace with your actual disk paths.
Step 3: Create Physical Volumes
Physical volumes (PVs) are the foundation of LVM. Create them on your disks:
pvcreate /dev/sdb /dev/sdcVerify they were created:
pvs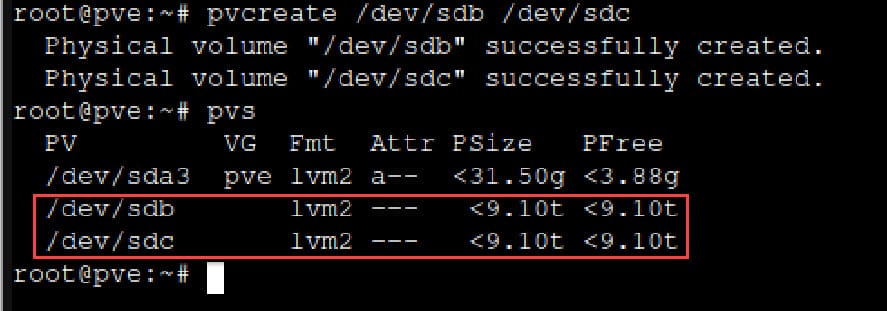
Step 4: Create a Volume Group
Volume groups (VGs) combine multiple physical volumes into a single storage pool:
vgcreate vgrp /dev/sdb /dev/sdcWhere vgrp is your volume group name (choose any name you like).
⚠️ CRITICAL WARNING: This setup has NO REDUNDANCY. If either /dev/sdb or /dev/sdc fails, your entire LVM Thin Pool and all VMs/containers on it will be lost. For production use, consider:
- Using ZFS with mirroring instead (see our ZFS guide)
- Setting up LVM RAID:
lvcreate --type raid1for mirrored disks - Using this only for non-critical VMs/testing
- Keeping regular backups to another storage location
Verify the volume group:
vgs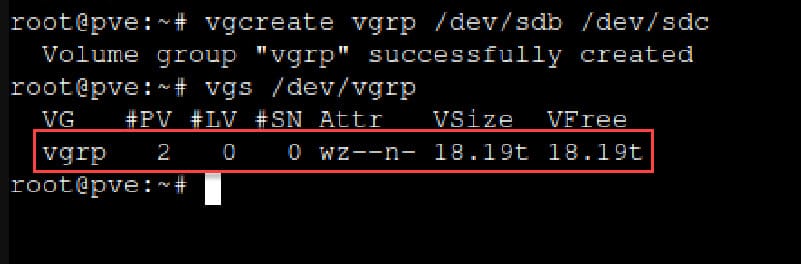
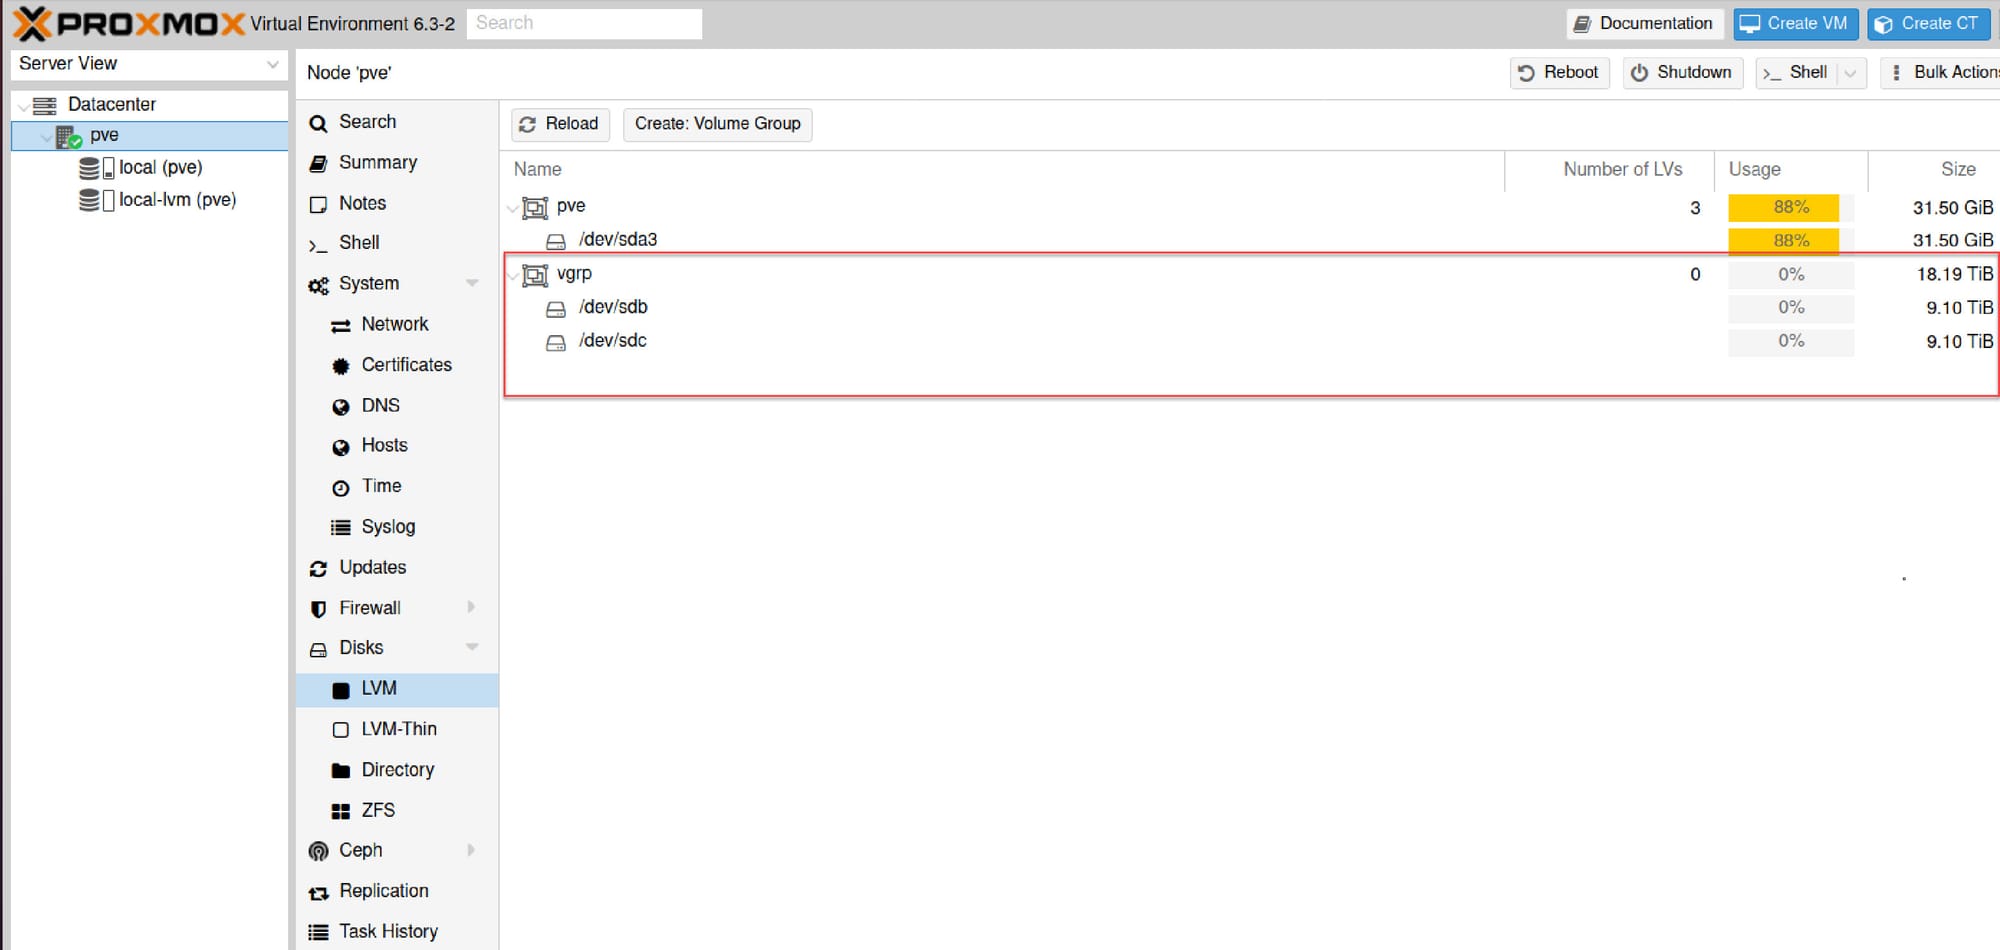
Check in Proxmox Web UI
Go to Disks → LVM and you should see your new volume group vgrp listed.
Step 5: Create the Thin Pool
Now create the actual thin pool on your volume group:
lvcreate -L 18.0T --thinpool thpl vgrpParameters explained:
-L 18.0T- Size of the thin pool (use your actual combined disk size)--thinpool- Creates a thin pool instead of regular LVthpl- Name of your thin pool (choose any name)vgrp- Name of your volume group

Pro tip: Leave some free space in the VG for metadata and snapshots. Don't allocate 100%.
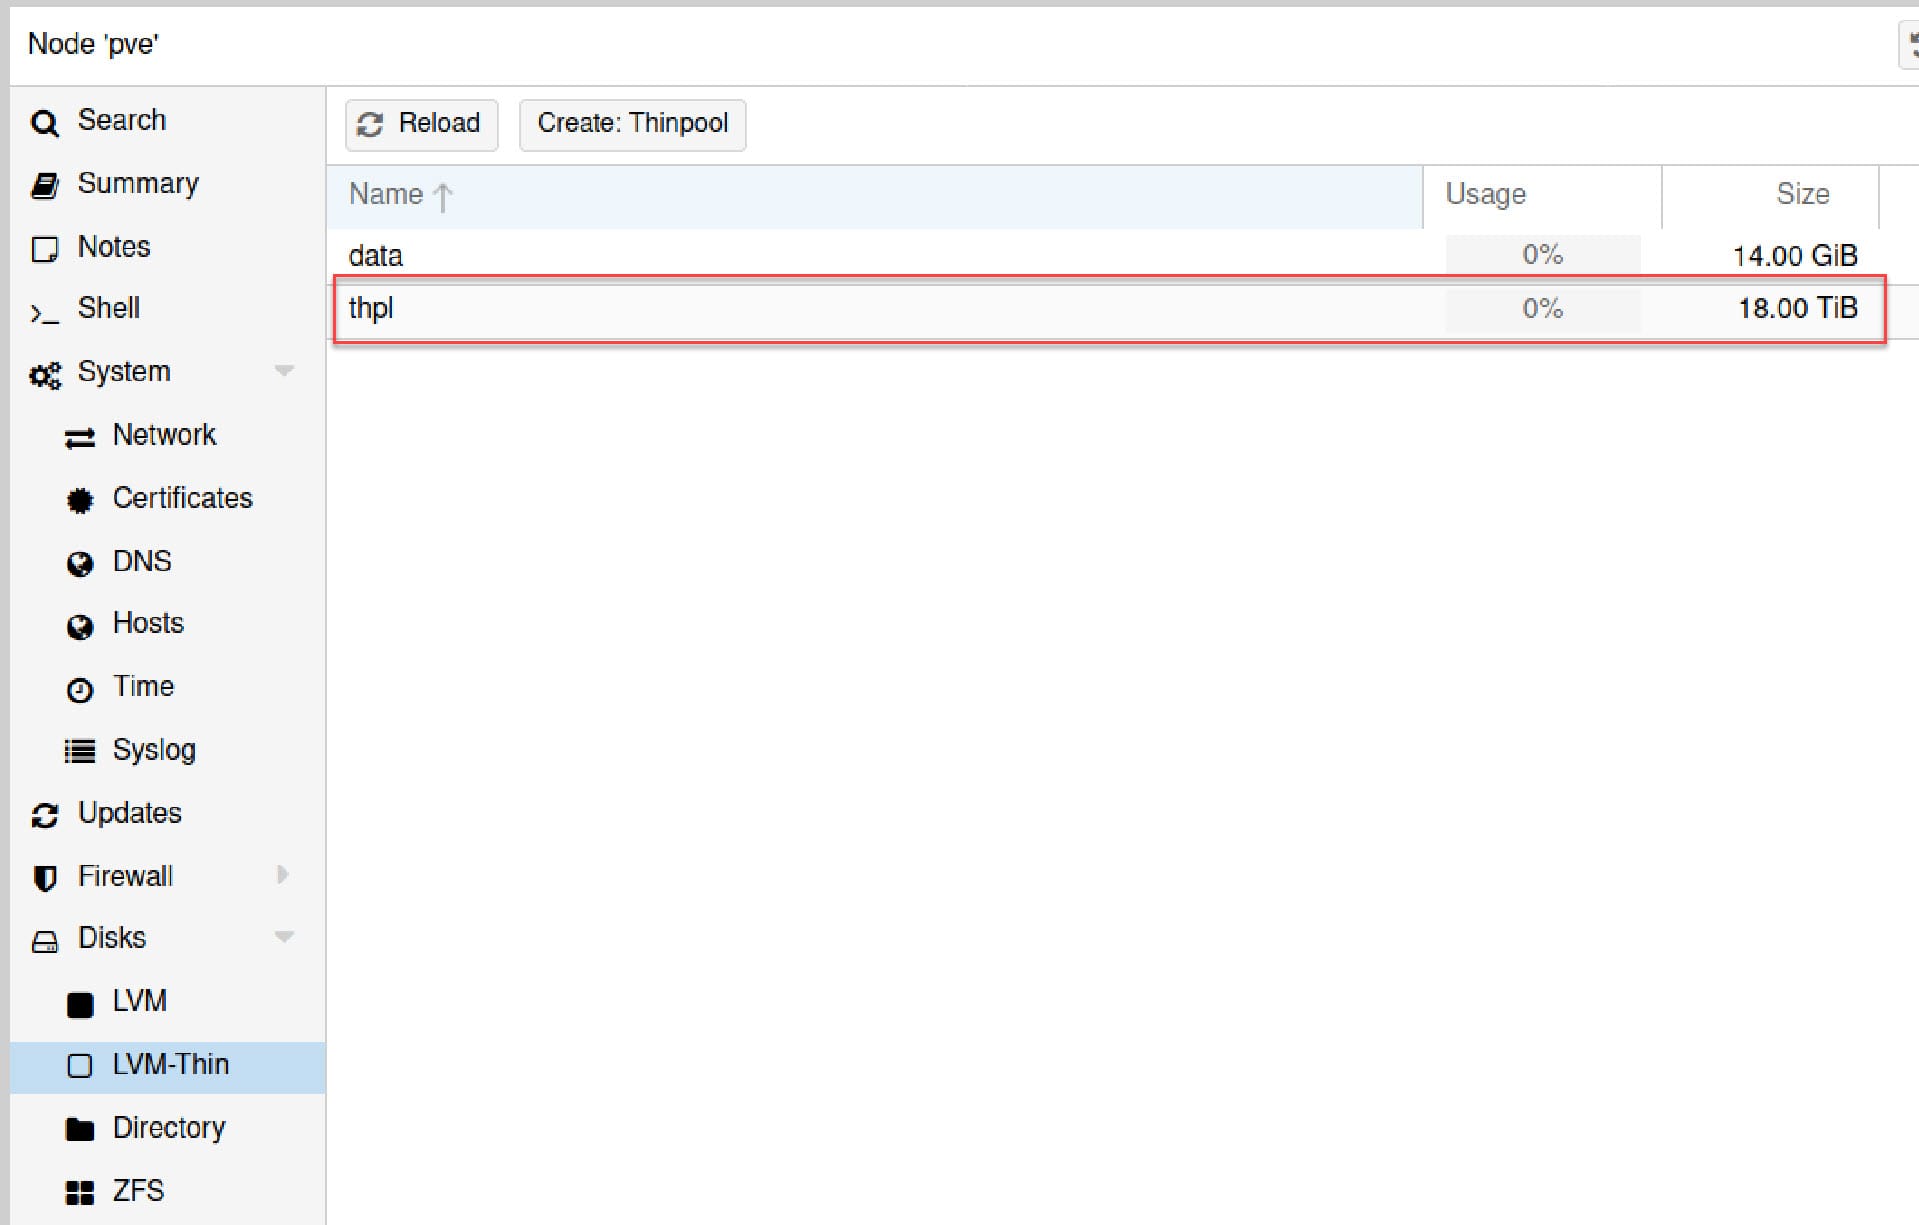
Verify the thin pool:
lvsCheck in Web UI
Navigate to Disks → LVM-Thin and verify your thin pool thpl appears.
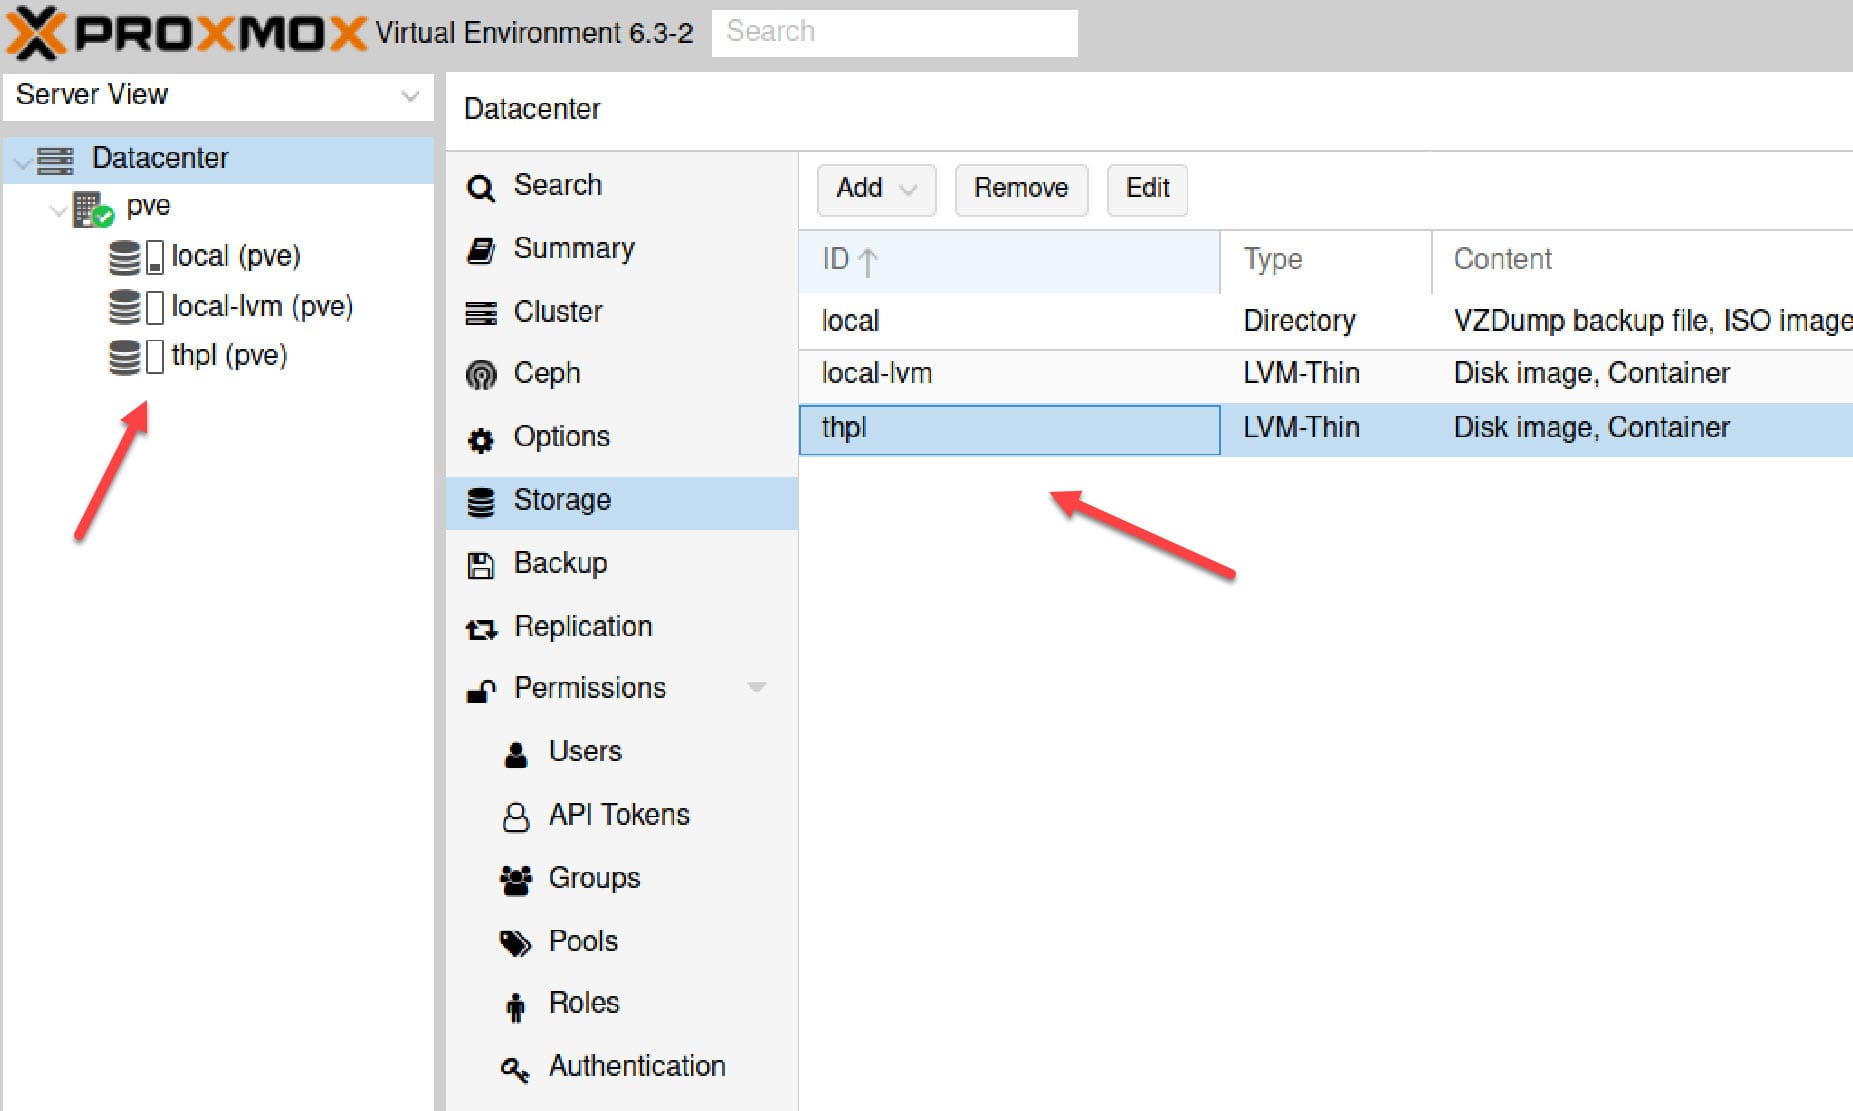
Step 6: Add to Proxmox Storage
Now add the thin pool to Proxmox's storage configuration:
- Go to Datacenter → Storage
- Click Add → LVM-Thin
- Fill in the details:
- ID:
thin-storage(or any unique name) - Volume group:
vgrp - Thin Pool:
thpl - Content: Select what you'll store (Disk image, Container)
- ID:
- Click Add
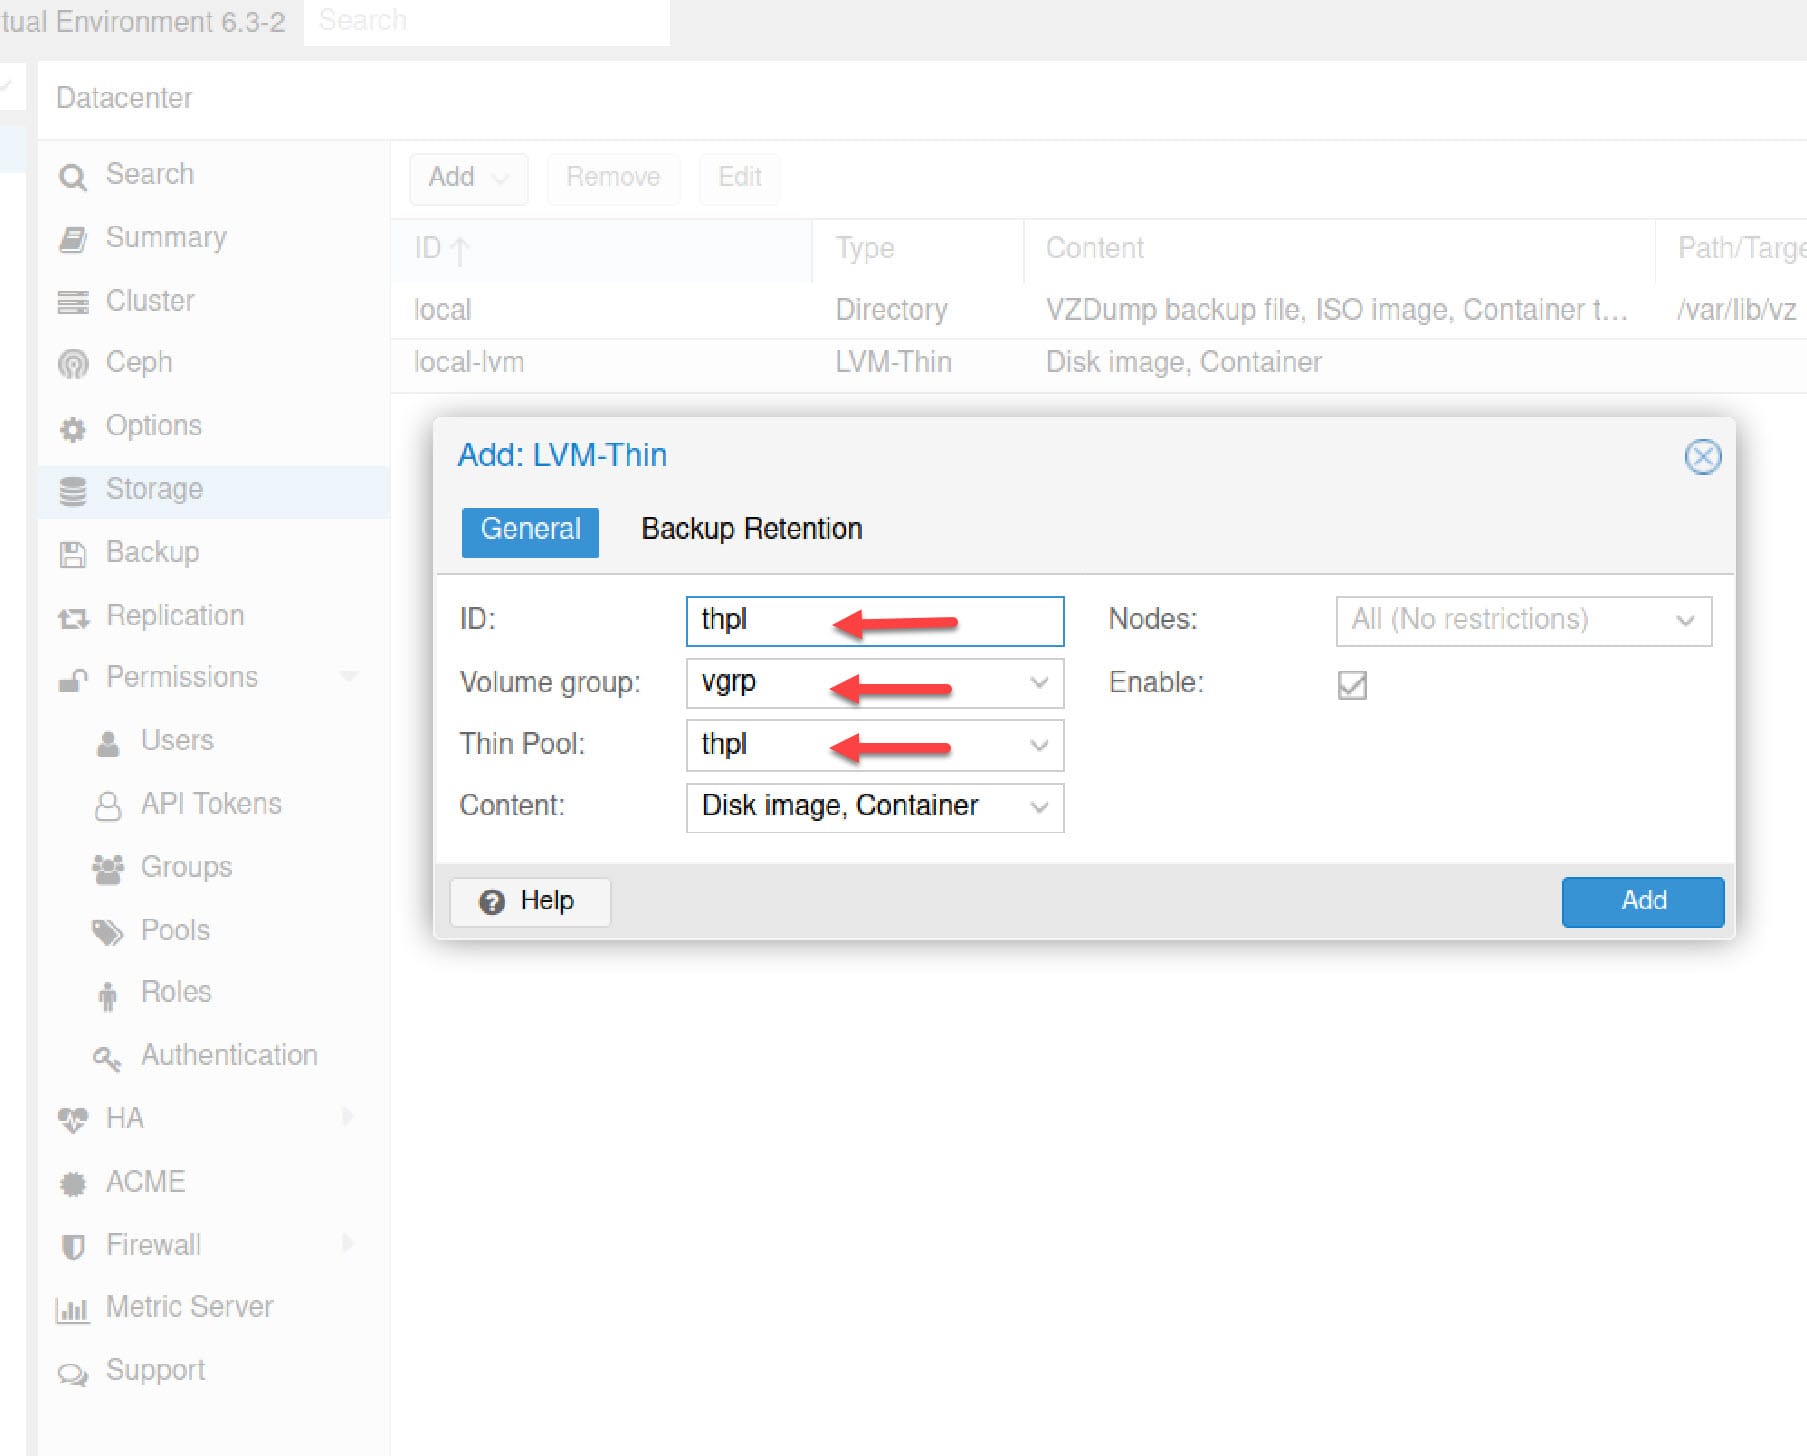
Your LVM Thin Pool is now ready for use!
Using Your LVM Thin Storage
You can now use this storage for:
✅ VM disk images - Select your thin pool when creating VM disks
✅ LXC containers - Use as container storage
✅ Over-provisioning - Create more virtual space than physical space
Example: When creating a VM, select your thin storage and allocate a disk. The space is only consumed as the VM writes data.
Managing Your Thin Pool
Check Pool Usage
# See thin pool usage
lvs

# Detailed view
lvs -a
Monitor Free Space
Critical: Keep an eye on actual disk usage. If your thin pool fills up, VMs will fail!
# Check volume group free space
vgs

# Watch for thin pool reaching 100%
watch lvs
Set up monitoring or alerts when thin pool usage exceeds 80%.
Expand the Thin Pool
If you're running low on space, you can add more disks:
# Add new physical volume
pvcreate /dev/sdd

# Extend volume group
vgextend vgrp /dev/sdd

# Extend thin pool
lvextend -L +5T vgrp/thpl
Troubleshooting
"Insufficient free extents" error?
- Check
vgsto see available space - You may need to add more disks or reduce the thin pool size
Thin pool full but VMs show free space?
- This is over-provisioning biting you
- Delete unused VM disks
- Add more physical disks to the VG
Can't create VMs on the thin pool?
- Verify the storage is enabled: Datacenter → Storage → check enabled box
- Ensure "Disk image" content type is selected
Performance issues?
- LVM Thin can be slower than ZFS for some workloads
- Consider using SSDs for the thin pool
- Check if you're hitting I/O limits on physical disks
LVM Thin Pool Best Practices
✅ Don't over-provision beyond 2x - Keep it reasonable (e.g., 200GB physical = max 400GB allocated)
✅ Monitor usage actively - Set alerts at 80% physical usage
✅ Leave 10-15% free in VG - For metadata and snapshots
✅ Use SSDs for better performance - Especially for VM workloads
✅ Regular pruning - Delete unused VM disks and snapshots
Comparing Storage Options
| Feature | LVM Thin | ZFS | Directory |
|---|---|---|---|
| Over-provisioning | ✅ Yes | ❌ No | ❌ No |
| Snapshots | ✅ Yes | ✅ Native | ❌ No |
| Compression | ❌ No | ✅ Yes | ❌ No |
| Data Checksums | ❌ No | ✅ Yes | ❌ No |
| Setup Complexity | ⭐⭐ Easy | ⭐⭐⭐ Medium | ⭐ Easiest |
| Memory Usage | ⭐ Low | ⭐⭐⭐ High | ⭐ Low |
| Performance | ⭐⭐ Good | ⭐⭐⭐ Great | ⭐⭐ Good |
Next Steps
Now that you have LVM Thin storage in Proxmox:
- Create VMs and containers using your new storage
- Set up monitoring for thin pool usage
- Consider adding more disks as your needs grow
- Explore ZFS storage as an alternative
Need help? Drop a comment below or check the Proxmox LVM documentation.