Proxmox HDD Passthrough to a VM

Tested on: Proxmox VE 7.x and 8.x | Last verified: November 2025
Need to pass physical hard drives directly to a Proxmox VM? Whether you're running TrueNAS, OMV, or a NAS VM that needs direct disk access, this guide shows you how to quickly pass through HDDs or SSDs using the command line.
Why Pass Through Physical Disks?
Common use cases:
- ✅ NAS VMs - TrueNAS, OpenMediaVault need direct disk access for ZFS/RAID
- ✅ Storage management - Let the VM handle disk management instead of Proxmox
- ✅ Dedicated disks - Give specific disks entirely to one VM
- ✅ Testing - Test disk configurations without reformatting
Understanding Disk Passthrough Methods
There are two main ways to give VMs access to physical disks, and they're very different:
Method 1: Disk Passthrough (qm set) - This Guide
What it is: The VM gets a virtualized disk that maps to a physical disk. Disks appear as "QEMU HARDDISK" in the VM.
Pros:
- ✅ Simple, works immediately
- ✅ No special hardware needed
- ✅ Good enough for most NAS VMs
Cons:
- ❌ No SMART data access
- ❌ Virtualization overhead (slower than PCI passthrough)
- ❌ Prevents VM live migration
- ❌ Can't snapshot that specific disk
Method 2: PCI/HBA Controller Passthrough
What it is: Pass through the entire SATA/SAS controller. VM gets direct physical access to all disks on that controller.
Pros:
- ✅ Full SMART data access
- ✅ No virtualization overhead
- ✅ Disks show real model names
- ✅ Best performance
Cons:
- ❌ Requires separate HBA card or available motherboard controller
- ❌ More complex setup (IOMMU, VFIO)
- ❌ All disks on controller go to one VM
TL;DR: For most homelab NAS setups, disk passthrough (Method 1) is perfect. Only use controller passthrough if you need SMART monitoring or maximum performance.
Prerequisites
- Proxmox VE installed
- One or more spare HDDs/SSDs not used by Proxmox
- SSH access or use Proxmox web shell
- VM already created (must be a VM, not a container)
Note: This guide is for VMs only. For LXC containers, use bind mounts instead.
Step 1: Identify Your Disks
First, find the disk you want to pass through. Use stable /dev/disk/by-id paths instead of device names like /dev/sda which can change between reboots.
Option A: Quick Command (Recommended)
bash
lsblk |awk 'NR==1{print $0" DEVICE-ID(S)"}NR>1{dev=$1;printf $0" ";system("find /dev/disk/by-id -lname \"*\"dev\"\" -printf \" %p\"");print "";}'|grep -v -E 'part|lvm'This shows all disks with their /dev/disk/by-id/ identifiers.

Option B: Manual Method
List all disk IDs:
bash
ls -l /dev/disk/by-id/Or use lshw for detailed info:
bash
# Install lshw if needed
apt install lshw

# View disk details
lshw -class disk -class storage
Pick the disk identifier you want to pass through. It will look something like:
ata-WDC_WD40EFRX-68N32N0_WD-WCC7K1234567scsi-35000cca25106ee14wwn-0x5000c500c35cd719
Pro tip: Related to our ZFS disk identification guide - these persistent identifiers are crucial for stability.
Step 2: Pass Through the Disk
Use the qm set command to add the disk to your VM:
bash
qm set <VM_ID> -<controller><number> /dev/disk/by-id/<disk-identifier>Parameters explained:
<VM_ID>- Your VM ID (shown in Proxmox web UI)<controller>- Disk controller type:-scsi0to-scsi13(recommended for most VMs)-sata0to-sata5(for specific compatibility)-virtio0to-virtio15(best performance, required for RAID controllers)-ide0to-ide3(legacy, rarely used)
<disk-identifier>- The full path from Step 1
Example
Pass /dev/disk/by-id/ata-WDC_WD40EFRX-68N32N0_WD-WCC7K1234567 as SCSI disk 3 to VM 201:
bash
qm set 201 -scsi3 /dev/disk/by-id/ata-WDC_WD40EFRX-68N32N0_WD-WCC7K1234567You should see output like:
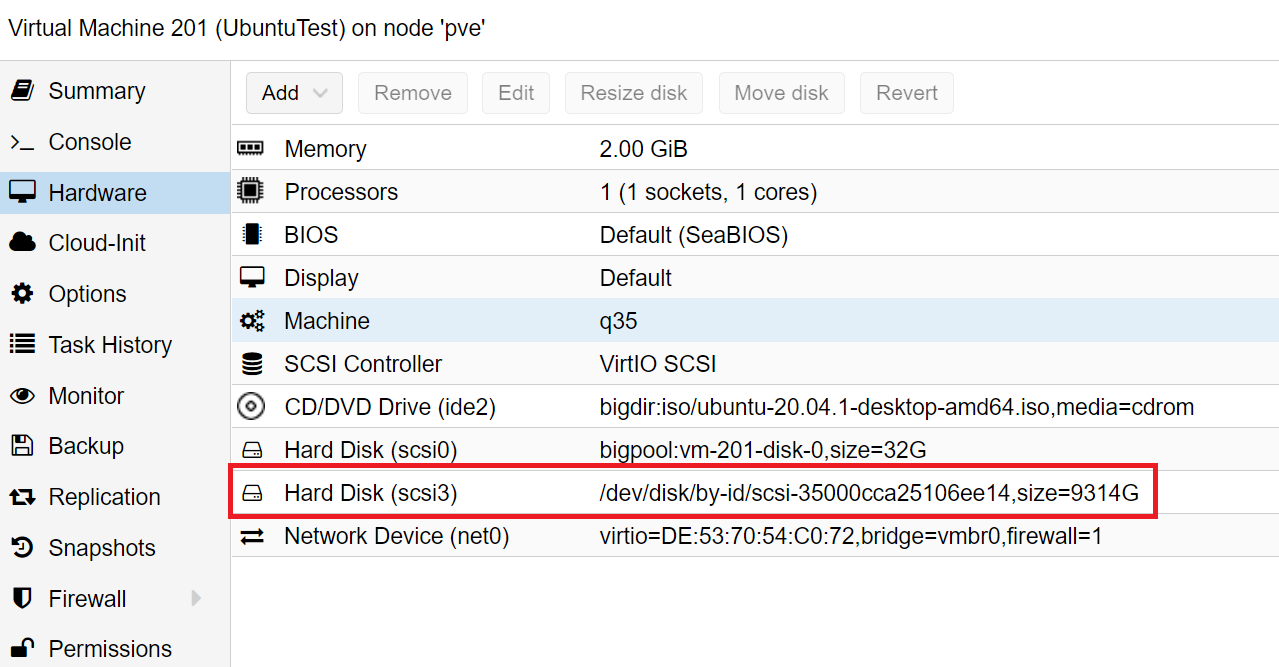
update VM 201: -scsi3 /dev/disk/by-id/ata-WDC_WD40EFRX-68N32N0_WD-WCC7K1234567Step 3: Verify in Proxmox Web UI
Go to your VM → Hardware section. You should see the new disk listed with the full device path.
Step 4: Restart the VM
Important: The VM must be restarted (not just rebooted from inside) for the disk to appear.
bash
qm shutdown <VM_ID>
# Wait for VM to fully stop
qm start <VM_ID>
Or use the web UI: Stop the VM, then Start it.
Step 5: Access the Disk in Your VM
Once the VM boots, the disk will be available:
Linux VMs:
bash
# List all disks
lsblk

# Or
sudo fdisk -l
TrueNAS/OMV:
- The disk should appear in the disk management interface
- Create your storage pool/RAID as normal
Windows VMs:
- Open Disk Management (diskmgmt.msc)
- Initialize and format the new disk
- May need VirtIO drivers if using VirtIO controller
Common Use Cases
For TrueNAS Scale VM
Pass through multiple disks for a ZFS pool:
bash
qm set 100 -scsi1 /dev/disk/by-id/ata-WDC_WD40EFRX_disk1
qm set 100 -scsi2 /dev/disk/by-id/ata-WDC_WD40EFRX_disk2
qm set 100 -scsi3 /dev/disk/by-id/ata-WDC_WD40EFRX_disk3
qm set 100 -scsi4 /dev/disk/by-id/ata-WDC_WD40EFRX_disk4
Perfect for our TrueNAS Scale exploration! More on that coming soon.
For OpenMediaVault VM
Same process - pass through disks then configure RAID/mergerFS inside OMV.
For Testing Storage Configurations
Pass through a single disk to test different filesystems or configurations without affecting your Proxmox host.
Important Limitations & Warnings
⚠️ Live Migration Disabled: VMs with passed-through disks cannot be live migrated to other Proxmox nodes.
⚠️ No Snapshots of Passed Disks: You can't snapshot the passed-through disk itself (only other VM disks).
⚠️ No SMART Access: The VM sees disks as "QEMU HARDDISK" and cannot access SMART data. For SMART monitoring, use HBA passthrough instead.
⚠️ Never mount on both host and VM: Don't mount a filesystem on the Proxmox host that's also passed to a VM - this will corrupt data.
⚠️ Backup Considerations: This disk won't be included in Proxmox Backup Server backups of this VM.
Troubleshooting
Disk doesn't show up in VM?
- Make sure you did a full stop/start, not just reboot
- Check you used the correct
/dev/disk/by-id/path - Verify the disk isn't already in use by Proxmox (check
/proc/mounts)
Wrong controller type?
- If using a RAID controller, use
-virtioinstead of-scsi - For Windows VMs, ensure VirtIO drivers are installed
Performance issues?
- Consider switching from IDE to SCSI or VirtIO controller
- Check if disk is actually being passed through (should show in
qm config <VM_ID>)
Need to remove a passed-through disk?
bash
qm set <VM_ID> --delete <controller><number>Example:
bash
qm set 201 --delete scsi3Alternative: Passing USB Disks
For USB-connected drives, you have two options:
Option 1: Pass USB port (in web UI)
- VM → Hardware → Add → USB Device
- Select "Use USB Port"
- Any device on that port goes to VM
Option 2: Pass USB device by ID
- VM → Hardware → Add → USB Device
- Select "Use USB Vendor/Device ID"
- Device follows to VM regardless of which port
Note: USB passthrough can be unstable under heavy load. For USB HDDs, consider PCI passthrough of the USB controller for better stability.
When to Use Controller Passthrough Instead
Consider HBA/controller PCI passthrough if you need:
- ✅ SMART monitoring inside the VM
- ✅ Maximum performance (no virtualization overhead)
- ✅ Real disk model names visible in VM
- ✅ Many disks (easier to pass one controller than 10 disks)
Typical setup: Add a PCIe HBA card (like LSI 9211-8i), connect all NAS drives to it, pass the entire HBA to your TrueNAS/OMV VM.
Next Steps
Now that you can pass disks to VMs:
- Set up a TrueNAS Scale VM with ZFS storage
- Create an OpenMediaVault NAS VM
- Test different RAID configurations
- Explore ZFS storage in Proxmox directly on the host
Questions about disk passthrough? Drop a comment below or check the official Proxmox wiki on disk passthrough.